|
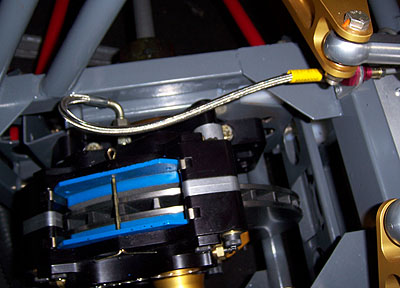
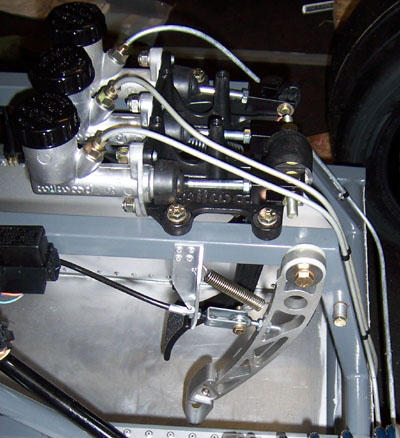
06/26/06 A few more steps today. I figure if I do at least a little bit every week then at some point I'll be done with all the little things to be done... Ugh, sounds tedious but seems that's what it's going to take. Anyway, received the new flex lines and a few other parts. The rear went on OK. The front, where the caliper has much less clearance to the frame rail, wouldn't fit. Damn. After staring at it for a bit I realized that I could just attach the line to one of the bleed ports and plug the side port. Which is what I did, after dismantling a hex drive socket so I could tighten the plug - the thing was too long to fit between caliper and rail so I just pulled the shaft out and used a wrench to turn it. Improvise, adapt, overcome.
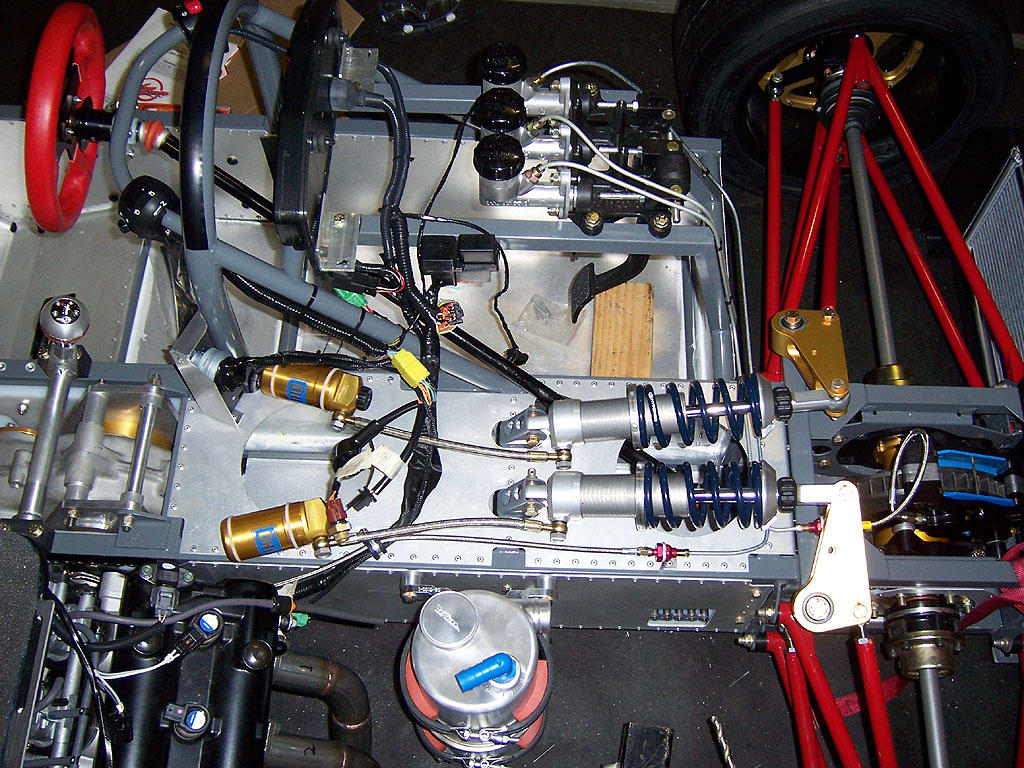
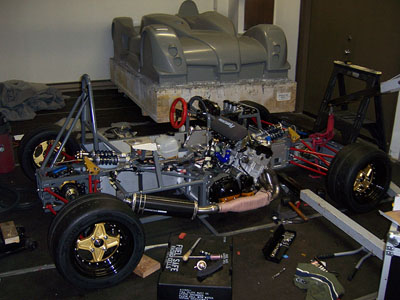
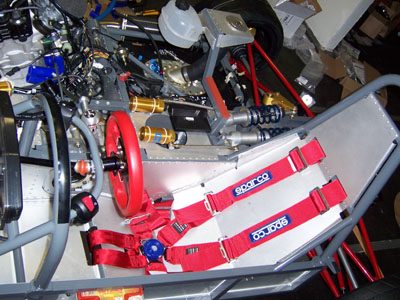
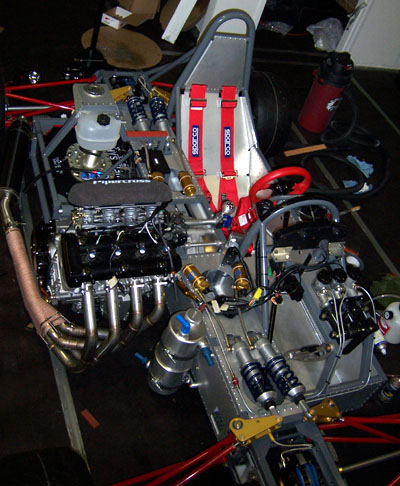
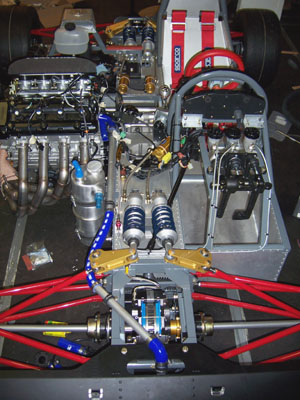
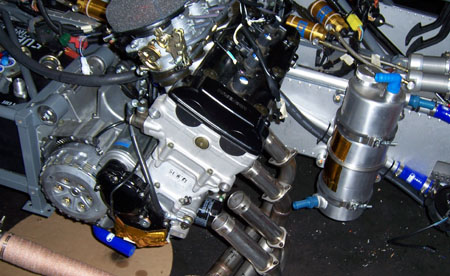
Also installed the clutch line. The brakes can now be filled with fluid but the clutch can't yet because I don't have the slave cylinder debacle sorted out. It'll happen. The car is definitely looking more 'complete' every day - click the picture below for a larger version.
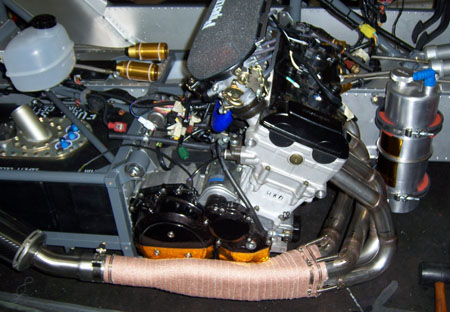
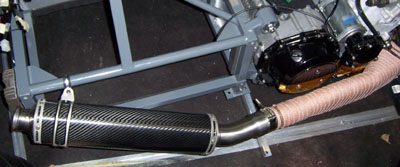
Scary part is just how much is still left to do. A little bit every week. Sigh. 06/28/06 Couple more items. The first, heat shielding for the exhaust, is fairly straightforward. Attached some reflective shielding to engine and oil tank, wrapped the header with wrap. Easy.
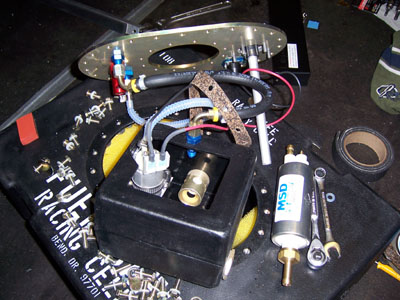
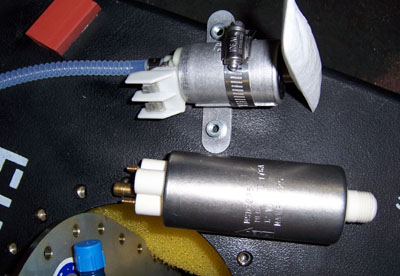
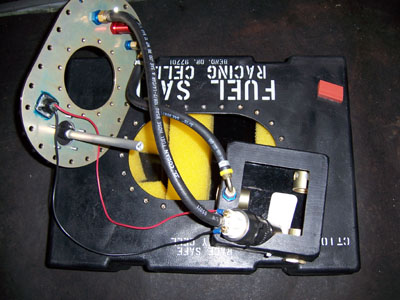
At the moment I didn't feel like wrapping the individual header tubes but I might do it later. Then, I pulled out the fuel cell and took it apart to install the high-pressure pump. This is where things get more challenging. First, it's a good thing I took apart the cell because it was not configured correctly internally - the internal reservoir was on the side and not at the front as it should have been. The issue, however, is that the new pump is much larger than the old and does not have the integrated filter. So now I need to get a separate filter and figure out how to mount all the stuff inside. Not a huge deal, just more hassle.
So now I have more parts to order and wait for. Also, tried tightening the wheel hubs to an approximate 250 lb-ft (by putting my 185 lb weight on the pipe-extended ratchet at about 15" from the hub). The play went away in couple wheels, still there in the other two. Hmm... Not sure what to do at this point. The bearings are brand-new. One thing I realized is that I neglected to put washers under the hub nuts so that may be affecting things. I'll get some shortly and see if it makes a difference but I'm not holding my breath. C'mon, how about things just going smoothly for a bit. One can dream. 07/01/06 Couple more items, in keeping with the incremental progress goal. The first is indeed a small step but a major worry off my shoulders. By using stainless washers and putting just a touch of grease on the washer surface I was able to preload the wheel bearings to where there is no play while they still rotate freely. Whew. Was beginning to wonder there for a while. The other item is that I got a muffler support band from the Ducati dealer. The band is for a 748 but while the muffler I got is for a Monster, the shape is the same so the band works very well.
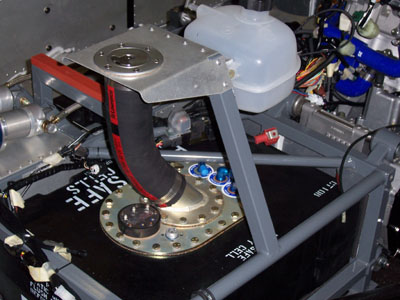
This is not a permanent solution, just something to get the thing running. Not bad for a $100 muffler off eBay. The bodywork will fit over this for test-fit purposes but I don't think I want to run it with the exhaust going into the rear fender, vented though it may be. At any rate, bodywork is the least of my concerns right now and this is good enough to consider the exhaust handled for the moment. Fuel cell is next, as is gas pedal/throttle cable design, the neverending story of the clutch slave cylinder, water plumbing, oil plumbing and fuel plumbing. Still quite a list although it has in fact gotten shorter. 07/30/06 Finally got some of the parts I've been waiting for so finished up the fuel cell and installed it. More parts showing up in a couple of days so I'll be able to make more progress shortly.
Still need to design the gas pedal and deal with the clutch. But things are moving forward. 08/14/06 I've been making steady progress, punctuated by waiting for parts which are often back-ordered, not shipped, mispacked, misplaced and generally messed up. There's been a lot of that lately, actually. I could write half a page about all the little and not so little things that went wrong in the last two weeks. But they are all surmountable, just takes time and money. For example, gas pedal. Lotus can sell me the foot pad but not the pedal itself, claiming there is no part number for it. However ElseParts in England is happy to sell me a brand-new, Lotus manufactured pedal for a mere $30. They can't supply the foot pad though. So I ended up getting the respective bits where I could and now I finally have a gas pedal. Just need to make a bushing for it and figure out how to order the custom throttle cable.
Received and installed seat belt. Except I ordered one belt and two anchor kits but got two belts and NO anchors (even though the invoice was correct) so now I need to straighten that out.
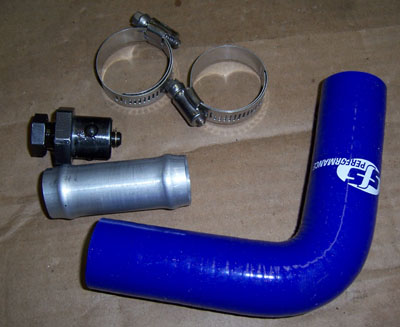
Also ordered the tubing and beaders for the 1" coolant lines and 3/4" oil lines. Of course only the 1" stuff came in. I think I now might have enough bits to actually put together coolant plumbing. Then again, since I haven't done the routing in CAD, I may end up needing more of the very expensive silicone elbows. We'll see. The beader does work pretty well though.
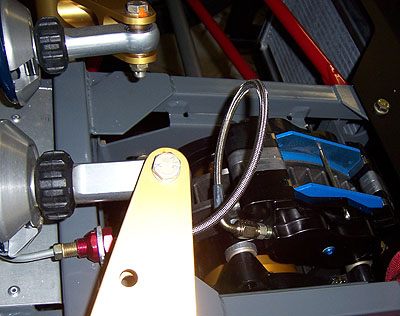
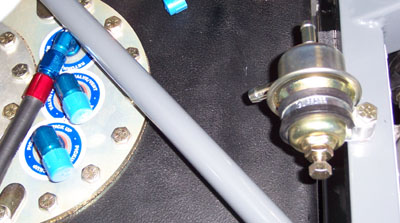
The only thing I will say about the clutch slave is that it's cursed. But I now know what needs to be done. Also found that the plug I installed in the side of the front caliper leaks like crazy. It's supposed to be 1/8" NPT so that's what I installed and even used sealer. No dice, so it's back to the drawing board on that one. Oil and fuel plumbing is proving to be a nightmare. Trying to connect the various pieces from different manufacturers from different continents is a very frustrating and expensive exercise. There are a half-dozen different thread standards (AN, NPT, BSP, metric, etc) all of which look similar and sometimes even screw in but don't seal properly. Some fuel ports are 1/4", others 5/16". Oil is 15/16", 1", 3/4" and O-ring. This is nuts. I'm spending literally hundreds on various adapters and I don't seem to be any closer to a solution. Part of the problem is that many of the fittings are not specified by the manufacturer, I have to guess what they are or try to dig up some hints online. Ugh. I did mount the fuel pressure regulator, which of course came without any instructions as to which port is in and which is out. Naturally the ports are 5/16" and the return port on the fuel cell is 1/4".
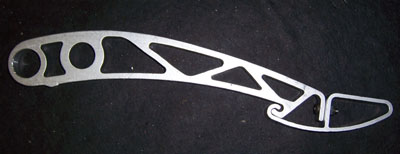
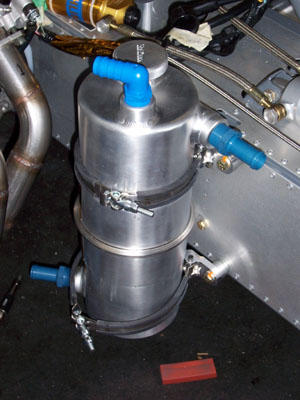
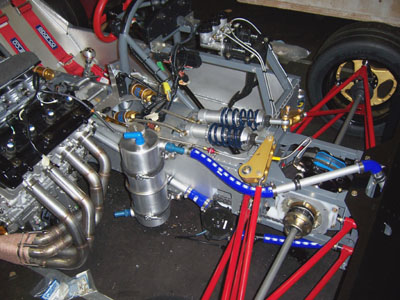
One place where I have prevailed is in the oil tank mount. I had gotten a 5" oil tank but of course the only brackets available are for 6" tanks. So I had previously tried using high-temp rubber spacers under the clamps and it seemed to work - until one day I found all the spacers on the floor (despite adhesive and clamps) and the tank dangling in the mount. At least it didn't happen on the track. I briefly contemplated getting a bigger tank (it's only money, right) but decided I was going to win this round no matter what. So after staring at the problem for a bit I realized that the clamp bands can be shortened - all it takes is drilling out the spot welds, cutting and re-bending the band and securing it with a couple rivets. So that's exactly what I did. Worked great (in the picture below, the upper band is shortened and lower one is still original).
So, if any of you are wondering what's taking so long, perhaps this will give you some idea :) Yeah, I'll get it done. Made it this far, right? I do want to thank everyone who has written to give support and encouragement, it helps. Meanwhile, the car is looking more and more complete every day.
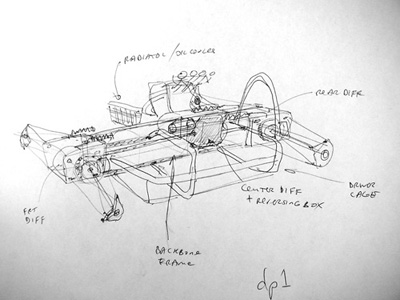
I just have to remind myself that I've come quite a ways from this:
08/16/06 Did some work on the plumbing. I now have all the water lines routed although I'm missing a couple pieces to be able to finish it and button it up.
I'm quite happy with the overall layout though so basically I consider this problem solved. Just need an hours worth of work to tidy it up, once the bits get here. There are lots of other parts on the way too so I should be able to make good progress in the next week or so. 08/19/06 Some progress and of course more frustration over the last couple of days. First, the correct guts to the clutch slave cylinder came in so I put it together and installed it. Quite a pain in the tight space but got it done. Went to try the clutch pedal and while it's quite stiff and short-traveled, things seemed to work ok... until I pushed a little too far and the clutch got 'stuck', refusing to re-engage. Oh, great. Already breaking things. So out came the slave cylinder, header came off to gain access to clutch cover, then cover was removed. The pressure plate was clearly way out but still attached and nothing obviously broken. So I gave it a very light tap with a hammer and it snapped back into place. Whew. Hopefully no permanent damage. So I trimmed the pushrod by 1/4" (this will prevent over-travel because a snap ring stops the piston in the cylinder) then put the whole thing back together again. Redrilling the clutch pedal changed the ratio from 5:1 to something like 9:1 which makes for very good feel and reasonable travel. The cyilnder clearance to the drive coupler is 1/10". So now, after much anguish and some 3 months of trying, I have a working clutch. Yay.
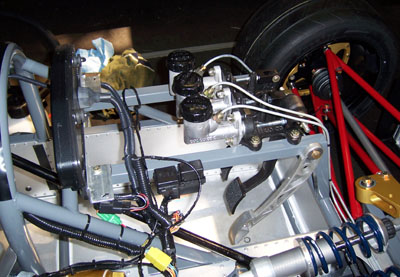
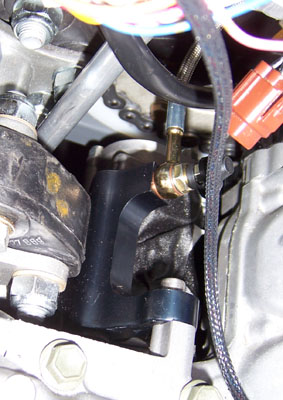
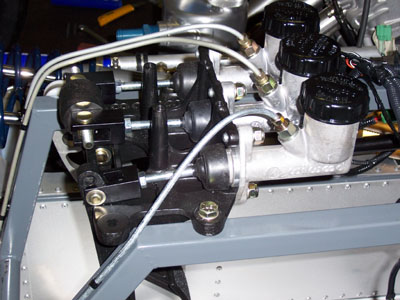
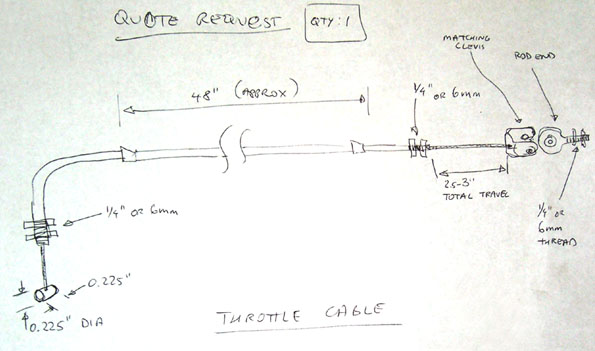
Also fabricated a pivot bushing for the gas pedal so now that's on and waiting for the cable. Of course frustrations continue. Yesterday when rolling the car around the left front wheel bearing started making noise again! I thought I had fixed the damned thing. Nope. Tried tightening the hub nut some more but no dice - at over 260 lb-ft it still wobbles. Today a few racecar engineers stopped by to check out my work and when I mentioned the bearings the reply was 'oh yeah, they do that - we just take them apart and grind the housing down a touch'. Uhm, ok, at least it's good to know I'm not the only one having the problem but what this means is that I'll have to take the upright apart, press the bearing out, grind the housing and then reassemble. These are brand-new production VW parts that are used in hundreds of thousands of street cars and many race cars too. It's hard to believe this is 'normal' and yet apparently it is. Odd. On the plus side I did figure out how to seal the power bleeder to the master cylinders so after replacing the leaking plug on the side of the front caliper I re-bled the brakes and they now seem to work quite nicely with good pedal feel and no leaks. Well, at least when the car is not moving ;) Next up - oil plumbing and all its undocumented, incompatible fittings. Fun. A friend was giving me pep talk on the project after hearing of the continued setbacks and my expectation of more. My reply was that this is an education first and foremost. There is a lot of experiments and a lot of untested theories in this project - from subsystems to suspension geometry and even the basic layout. When you stop and think about it, if after over a century of automotive development nobody has tried anything like this before, what it likely says is that I'm either a genius or an idiot. Maybe some of both, I don't know - but will soon find out :) And that's what it's all about. If I go into it expecting issues and having contingency plans for dealing with them, I will discover problems and solve them one by one. That's how development is done. On the other hand if I'm overly optimistic about everything working the first time, if things were to go wrong I'd be much more likely to get discouraged. So I'm just being pragmatic. Yeah, it's an experimental prototype. Some things will work, some won't. Either way I'll learn something and when I solve the issues that come up I will gain valuable experience and knowledge that no book or class can teach. And that alone makes it worthwhile to me :) Naturally some of the things are already redesigned in my head so in a way I'm laboring to complete a prototype that's already obsolete - but the answers it will provide are essential to taking the design forward to production, so it will get done. One challenge at a time :) 09/02/06 Progress is slow but I finally might have all the pieces I need to get the car to a startable state. We'll see. The final bit was a custom throttle cable that I ordered from Push-Pull. The process was easy - a simple hand sketch faxed to them, a quick phone conversation to confirm, then a couple days later they called me saying the cable is ready and got the shipping/billing info. It took a bit to fabricate the bracket (using the old saw-file-drill methods) and align everything but I now have three fully functional pedals. This is a welcome change from doing everything in CAD, proof that there's more than one way to go about things and that sometimes one approach is more efficient than another.
Looks like heel-and-toe should work pretty well, although a couple weeks ago I managed to sprain my right ankle (yes, I've been experiencing what I call 'high life impedance' lately ;) and while I can now walk ok, rotating it for h-n-t is still painful so I won't know for sure for a while. Fortunately there is quite a bit of room for adjustment in the relative alignment of the pedals therefore I'm pretty sure I'll be able to get a configuration that works well enough for test purposes. Have to keep reminding myself, this is just a prototype and its main purpose is to answer the myriad of questions and test the countless theories. If it does that, I'll be satisfied that it 'works'. One day, this chassis will hang on the wall in the lobby of dpcars inc. :) |