|
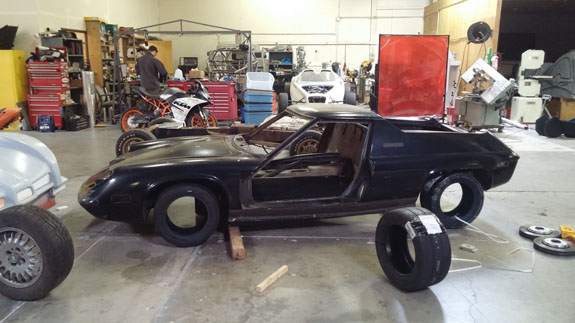
10/28/15 Yep, another new project. This one will be in the design stages for the next couple months while we work to finish up the Stiletto, new D2 bodywork and some other items. This isn't just any project though - it's a first step in something I've been thinking about for a very long time. And that is to create a modern rendition of some of the iconic lightweight classic cars. Not an exact replica, not a cutely styled mainstream car, but rather taking the original style and putting it on a modern platform that is still a basic and pure driver's car, but far exceeds the original in performance and safety. I tried to do that back in the early 90's when I bought a project Europa TC and attempted to completely redo it, replacing the chassis with one made by Spyder Cars in England. Learned a lot in the process and while I did get it running, I never fully finished the work. Fast forward 25 years. I've developed and successfully tested the D1/D4 platform, including proving it with a Pikes Peak Unlimited win in 2012. And I have had many discussions with Jeremy of JET Motors, a Mini fanatic, about putting a D1-derived chassis under a silhouette Mini bodywork. These conversations are still ongoing.
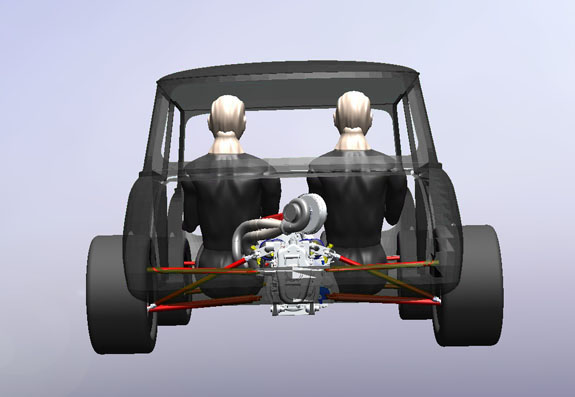
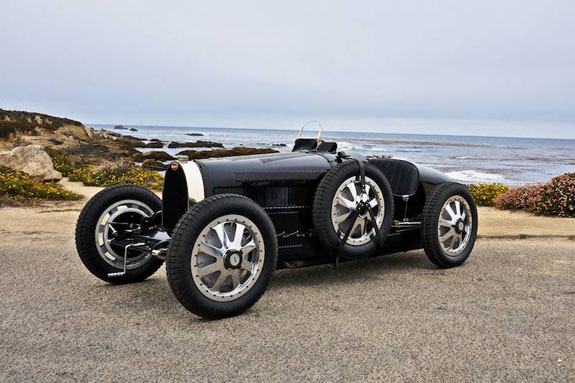
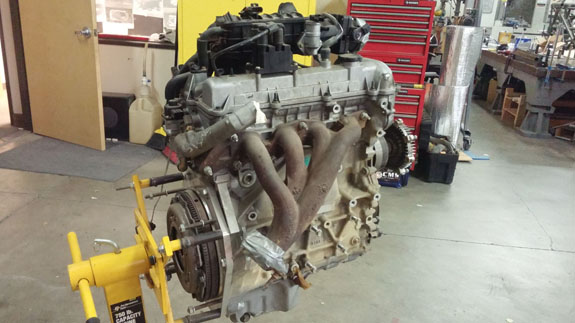
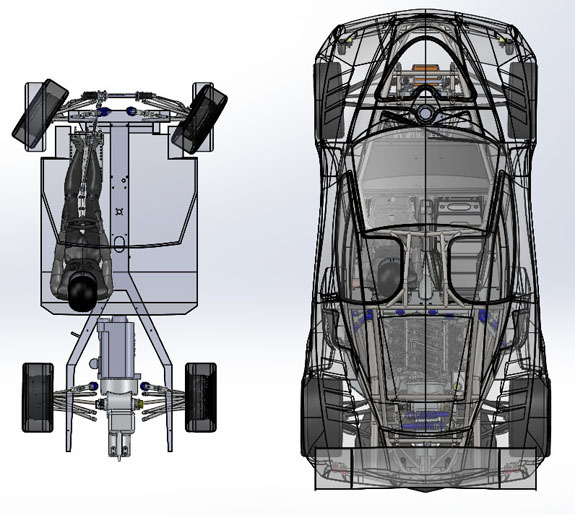
I've also been eager to make a Bugatti 35 replica using a Hartley Bolt 4-cylinder in the front and Hewland JFR transaxle in the back (both items shown above in a conventional mid-engine arrangement). Seeing Jay Leno's 35 recently just made me do it all the more. I know someone did make an exact replica (and Jay featured it on his show), but that's not what I want to do here.
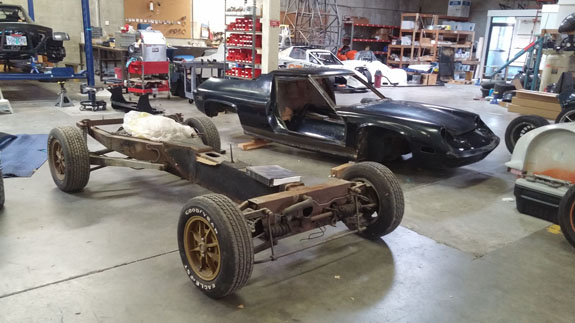
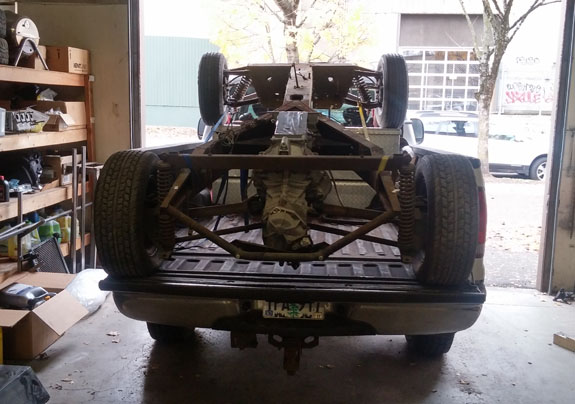
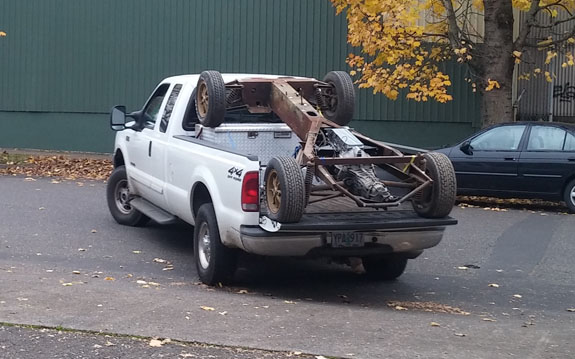
All of these cars would share key components like uprights, bellcranks, suspension arms, controls and many other bits. Most of them already exist in our inventory and they just need to be adapted to the application at hand. Several other possible candidates come to mind - the classic Fiat 500, the Bugeye Sprite, Lotus 23, etc. All I've been waiting for was a lead customer. So when Mike, owner of a project Europa TC, contacted me about doing a new chassis for his car, I was very interested. A few conversations later Mike's project is now in our shop. Certainly brings back memories!
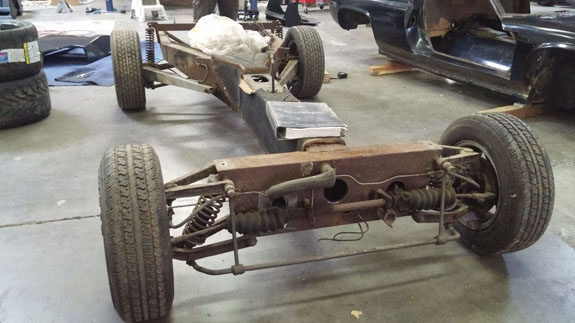
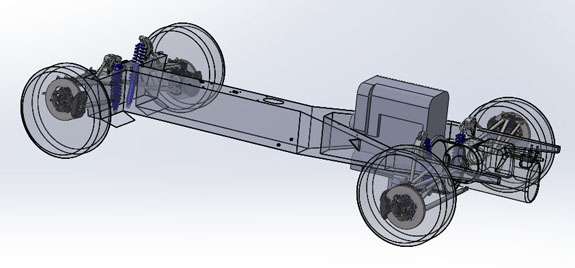
The only reason we have the chassis is so that we can measure it and get it into CAD. Not a single part of it will be reused. Because of the design, the replacement would have to be dimensionally compatible but we're going to add a full chromoly rollcage that will be structural and will bolt to the backbone. Mike's car will be using a Ford Duratec engine and a Porsche G50 tansaxle. He chose the latter for durability and availability - we have a couple of those taking full 430hp and 425 lb-ft torque in the D2s so in this application it will last forever. The G50 does weigh about 90 lbs more than a JFR but can be had for half the price. The engine will be completely gone through by another shop. It's also only here for us to get the measurements. An interesting tidbit - the Europa, at 159", is exactly the same overall length as a D2, but is much narrower (63" vs 80") and a bit lower (42" vs 46"). Wheelbase is also considerably shorter than the D2, 92" vs 103". Measurements will come first, then a lot of iterative design in Solidworks, and then the fun part - actually building it! 10/30/15 First reality check - getting the rough models into SolidWorks. Yep, it's going to fit. It'll be close of course, but I'm used to that. What I have to take note of here is that the original car was created without using computers of any kind at all. And to me, that is amazing. Really just have to pause and appreciate the original achievement. But now, with all the tools at my disposal, I believe I can do better. We'll see.
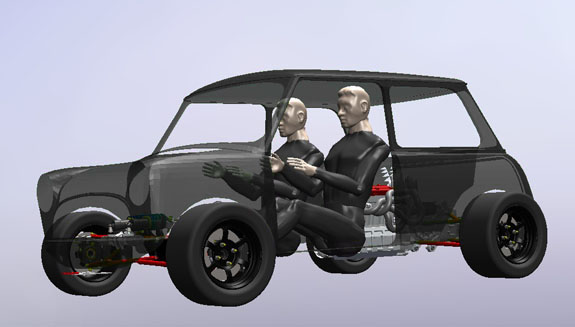
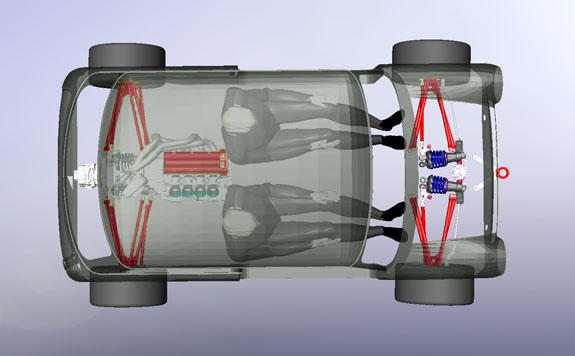
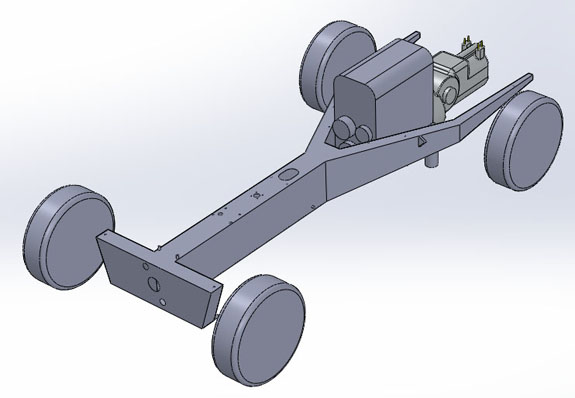
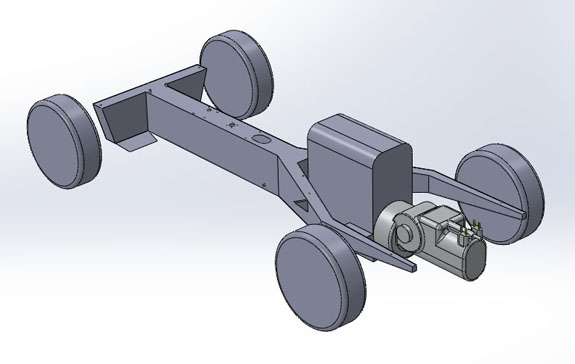
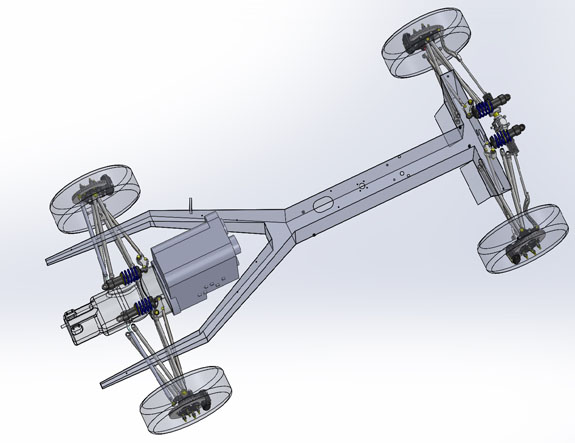
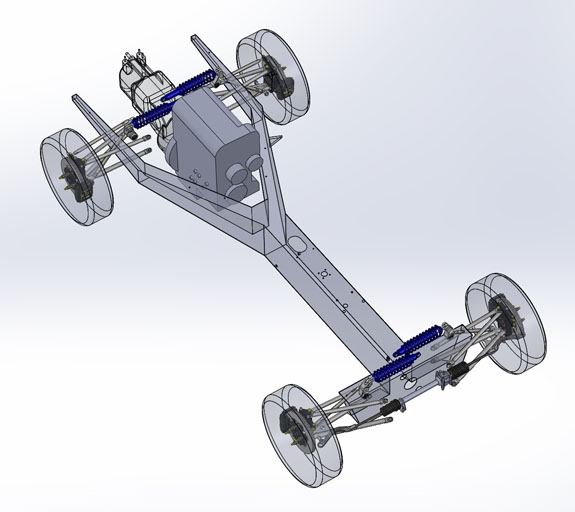
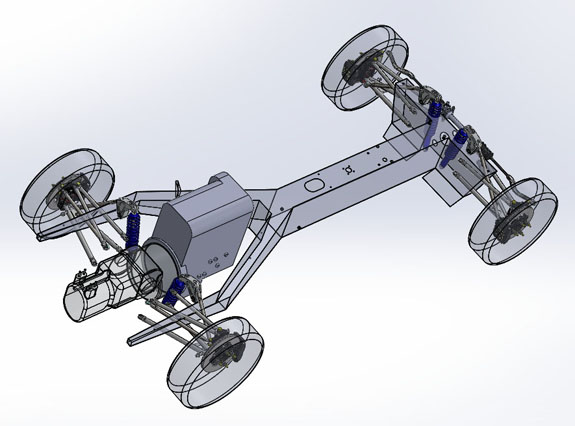
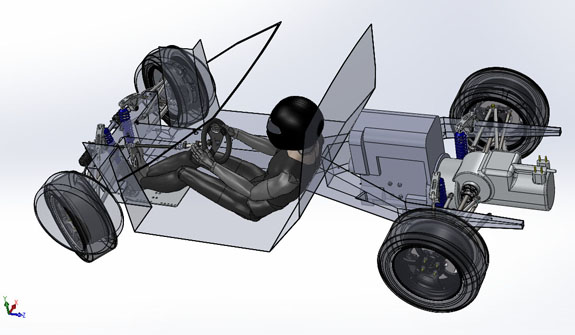
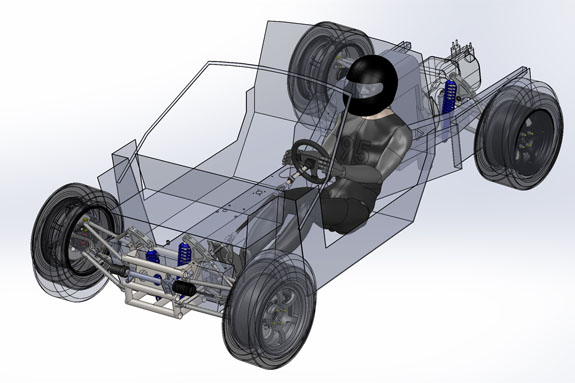
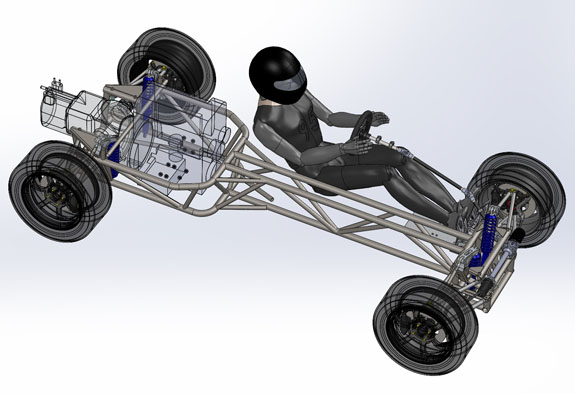
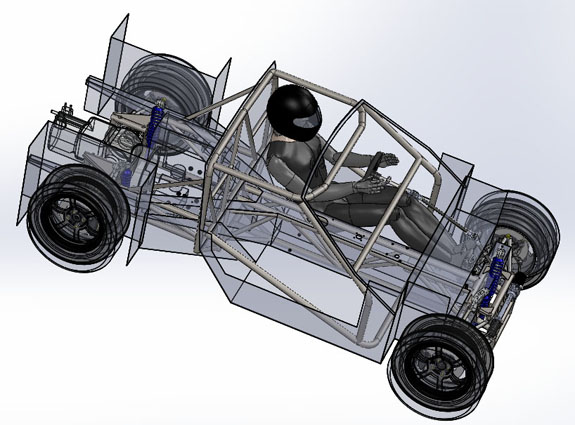
The response on FB to my initial post has been pretty enthusiastic. A few people mentioned other Europa projects and/or designs, notably the Banks 47 and 62. Yes, I'm well aware of those, and of course the Spyder chassis. The big difference between what I'm doing and those is that the others are improved Europas. Mine is going to be a cross between dp1, D2 and D4 - in a Europa suit. That's how I'm planning to also get it to wear a Mini suit, a Bugeye suit, and so on. So naturally when my chassis design is done it will look nothing like this. No T upfront, no Y in the back. It's going to be fun :) 11/24/15 The design is coming along. There are several goals. Obviously I want to use as much of the D1/D4 hardware as possible, but without it becoming a limitation. The track-only cars have about 2" of useful wheel travel which works well on smooth track, with high downforce and 3g cornering. For the street at least double that is needed. This means shock orientation will need to change and larger bellcranks are necessary, more like the D2. In fact I'm currently looking at using existing D2 parts for that portion of the suspension. In the meantime, this is what the general layout is looking like. The current iteration uses same suspension arms front and rear (like the D1/D4, but the geometry is different from those cars out of necessity). I'm hoping I can retain that aspect of it. Looks doable so far. There is also a good deal of room for aero tunnels under the arms, if someone wanted to do that down the line. Not an immediate priority, just leaving the possibility there.
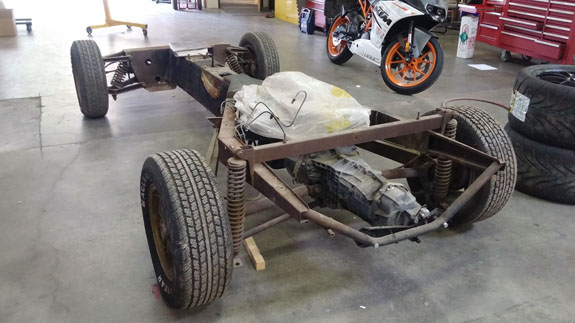
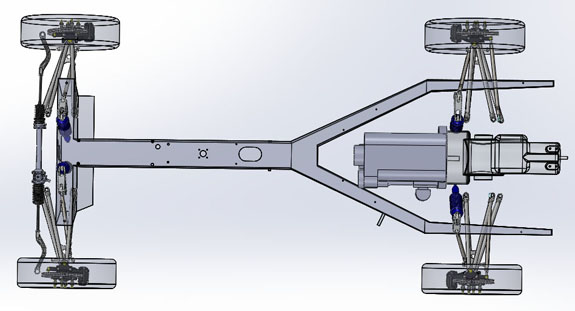
The original chassis is in the model for reference only, to show how the new suspension will fit in the overall layout. None of the original parts will be used. So now we no longer need the Lotus bits and Mike has hauled them away. If anyone wants them as spares or as a project, let me know and I'll put you in touch with him.
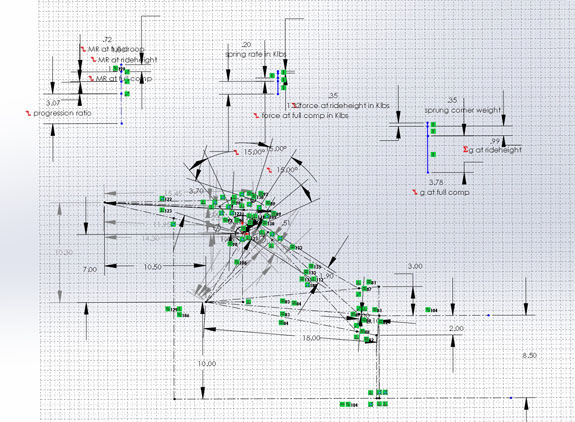
11/25/15 This is where the past 10 years or so of development really pay off. First, I have a number of existing, proven components I can 'cut-and-paste' into a new design. Second, there's all the experience and 'tricks' that help me make the choices. Below is a screenshot of my suspension design sketch. It's all parametric and can be tweaked to suit the installation with a couple of clicks. The equations give me key parameters that make the difference between something that works and something that doesn't. It's messy but I know what it does and why, so it's very effective.
In the midst of my what-if experiments, Tristan walked in and looked over my shoulder. 'This makes sense to you?' - 'Yep.' - 'Good'. First I tried the D2 rear bellcranks with shocks nearly horizontal. After many tweaks I arrived at something that might work geometry wise, but there are many packaging challenges and the geo is not as sophisticated or flexible as I want.
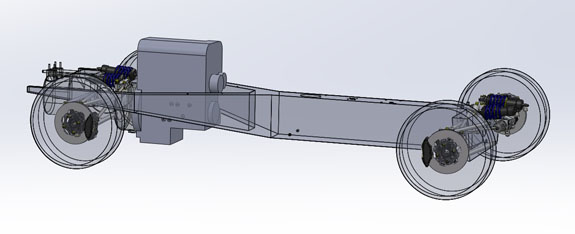
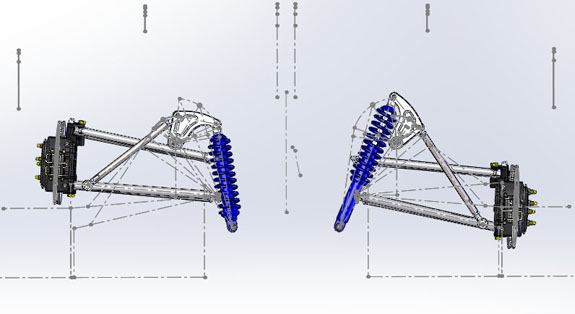
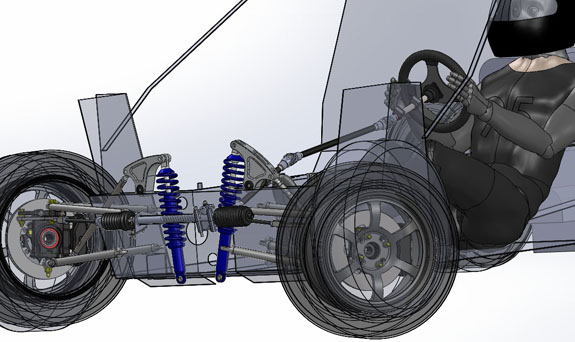
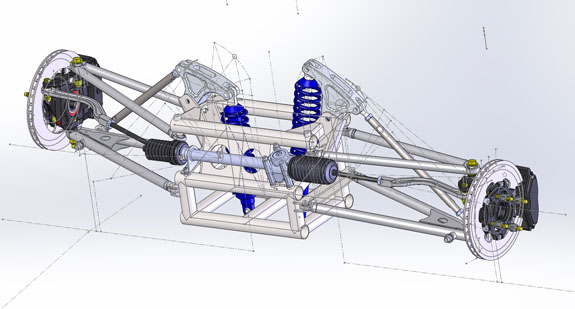
Since with this project I'm not just designing a Europa, but a range of chassis for a very varied set of applications, I felt I could do better with D2 front bellcranks and mostly-vertical shocks. A few tweaks and I'm very pleased with the results:
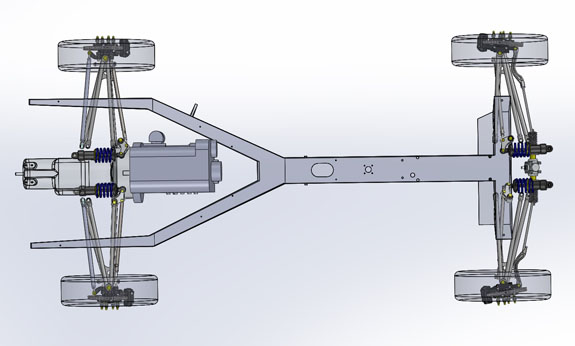
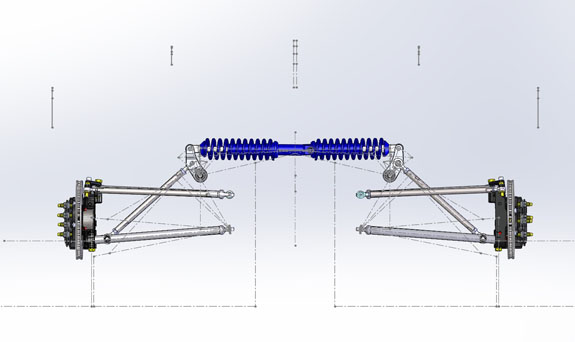
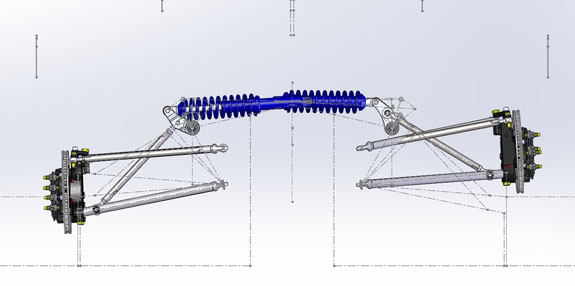
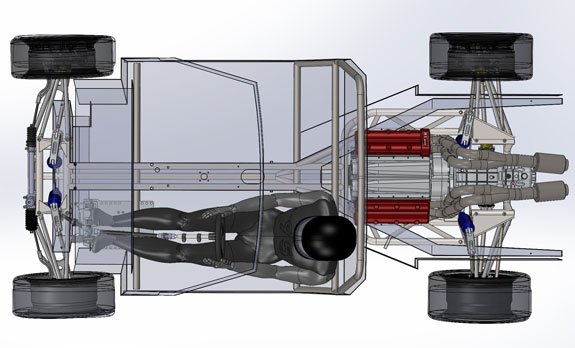
Next three pix show the range of available travel. Rear is first, with room for transmission, and front is next with shocks located to clear the steering shaft. The only thing different between the two parts-wise is the length of the pushrods, which is essentially a no-cost modification.
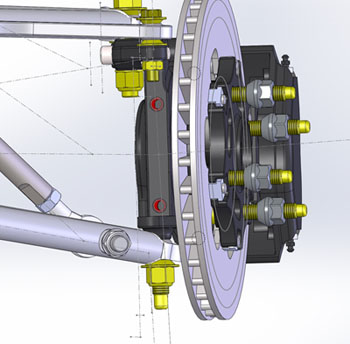
I think this version is a keeper. Now I can move forward with details, actual chassis design, and so on. Tons of work ahead but now it's much better defined. Amusing tidbit - sometime circa 1982, I saw a Europa in a grocery store parking lot (who drives one of these to get groceries?). It was the first one I saw in the flesh and around 5 years before I eventually bought one. The first thing I did was get down on the pavement and look up at the suspension, to see how it was implemented. People must have thought I'm nuts (debatable to this day). Didn't know much about suspensions back then but wanted to. Now I can confidently say I'm doing this a few levels better than the original. Progress. In the meantime, other projects are moving forward as well, more on that soon. 11/27/15 This is an iterative process. Now that I've gotten the basic geometry where I want it and it looks like I can package it with the major components, it's time to check some details. Specifically, things like clearance from uprights to suspension arm at full droop with wheels fully turned. Spherical bearing angularity at full droop and bump is another item on the checklist.
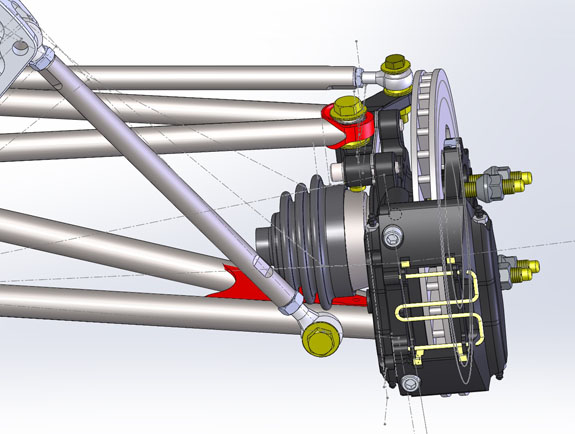
Yep, this clears. Barely, but clearance is clearance as we're fond of saying around the shop. It's a condition that will rarely, if ever, be encountered but good to know this works. The next one, the part I anticipated to be more of a challenge, is in the back with clearing the CV joint to pushrod and suspension arm at full droop.
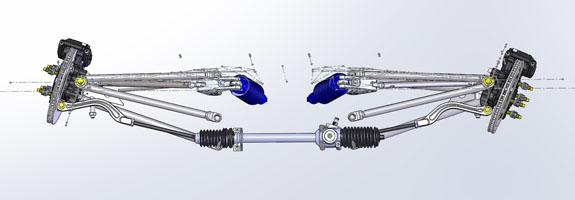
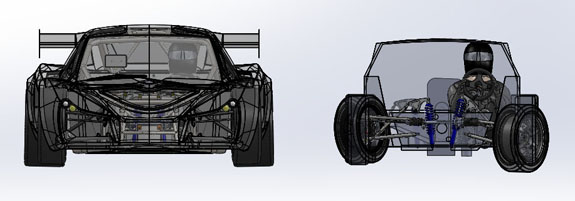
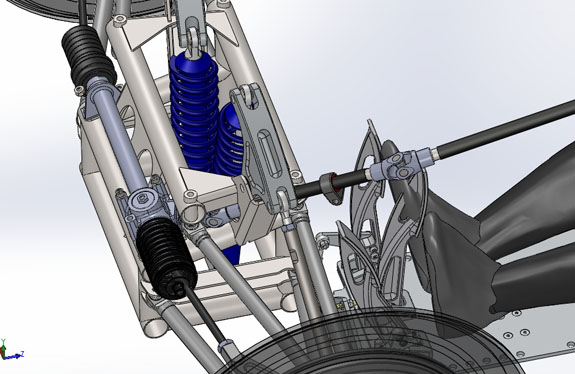
We use two styles of CV outboard on LT uprights. Both are commonly available (VW parts). One works, barely, the other doesn't. Some more attention is needed in this area it seems although having to stick with a particular CV is not a show stopper. I've been tweaking the suspension arm dimensions as I go, and moving other items around too. Some may have noticed that the steering rack changed from D4-based to D2-based along the way, as an example. Everything is connected to everything else. At this stage it's still possible that I'll have to make more major revisions to the design, but to find out if that's the case I need to get deeper into details. Figuring out the pickup points for all the components, and the structure to tie them together, is next on the list. We'll see how that goes. 12/9/15 That part about everything being connected to everything else, and the whole thing being an iterative process? Here's an example. Adding more detail, like driver, some interior dimensions, pedals, steering shaft - certainly impacts the details of suspension packaging. As do realities like available wheel offsets, vs. desired ones.
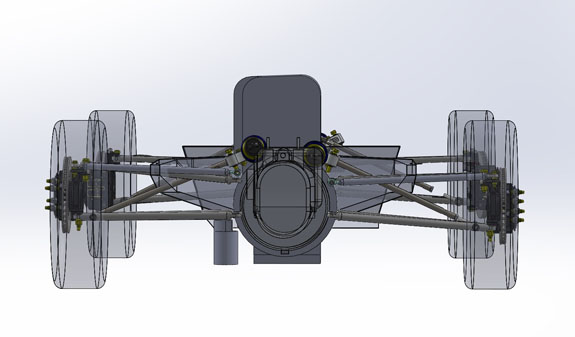
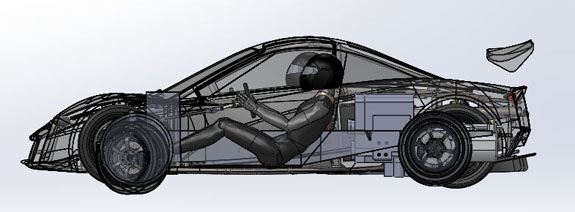
The steering shaft needs to clear the suspension pickups, the shocks and the pedals, all the while staying within the maximum u-joint angularity. This has to happen over full travel and full steering angle. Many tweaks later, it does. Interesting comparison to the D2 (which, as you may recall, is the same overall length as the Europa). Quite different packaging, and different focus too. I think the D47 will be about half the weight. And half the power. It will be interesting to see how they compare performance wise.
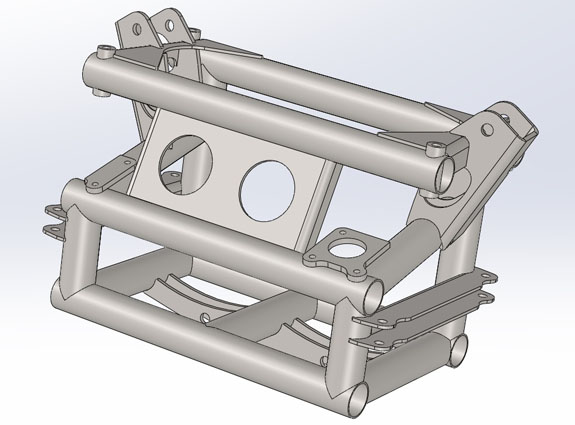
Sharp eyes will notice many tweaks to nearly all the suspension components both front and rear. All part of the process. Another interesting tidbit that adds to the appeal of the D47 and its future derivatives - a law just passed that allows limited volume manufacturers to sell complete replica cars without having to do NHTSA crash testing. Here's the Autoweek article about it. 12/15/15 Mike stopped by to drop off a seat and pick up the engine so he can take it to the shop that will be working on it. I showed him the model in the computer and his observation was 'you figure out the suspension and then connect the dots'. Well, yes. This made me think a bit about the process so I'll outline it here. I start with the knowns - and the first question is, what is the goal? It's different for each design. D4 was the smallest, lightest, best-handling car that can put down the most power, while using a standard bike engine and transmission. D1 was the ultimate evolution of that, removing the standard powerplant constraint. D2, a streetable two-seater with LS power for emissions compliance. All were clean sheet designs. The D47 is different. It's a way to put my chassis under existing classic designs. Many classic designs. So it needs to be adaptable to a variety of installations. As I'm designing this car, I'm designing several others. Once the goal is clear, choices can be looked at in proper context. In other cars I chose the dimensions. D2 is as wide as it can be and still fit in a normal trailer, with the minimal wheelbase to accommodate the V8, the transmission, and the occupants. D4, the minimal footprint (ended up 68" wheelbase). This one is a Europa. So the basics are known - occupants, engine, transmission, wheels/tires. Actually we changed the wheels mid-stream but the process is flexible enough to accommodate this. Which is good. It's interesting to compare Chapman's packaging to mine. Many similarities, but some things are different. I do continue to be impressed with the original design, especially given what they had to work with. Yes many solutions are cheap and compromised, but I can see why the choices were made. And now I get to do it differently. Once the packaging constraints were in CAD, I went through dozens of iterations to arrive at the best geometry I could squeeze into the available space. 'Best' of course is context-sensitive too. The tradeoffs are target parameters (desired camber curves, progression curve, bump steer, etc.) vs realities of available parts and the loads they have to deal with. Some of them I make so those are the things I can change. Others are what they are, or are difficult/expensive to change, so I have to adapt. Or at least should. Experience helps navigate the choices and it's good practice for future variants, to see how the tradeoff play out. Now that the major pieces are in place, time to try and connect the dots. It's not an easy task and I always have to remain open to making more geometry tradeoffs if need be. The most effective way for me to do that is to run it through my in-head 3D simulator. Lots of rough iterations, very quickly. From the outside it just looks like I'm sitting there staring at the screen :) Once I pick one worth trying, CAD has to be done because things that might seem to work in approximation quite often don't, once the pesky real-life dimensions come into play. Below is one result, after literally a dozen different versions - the front subframe that connects the dots of the front suspension while taking up the loads and being manfuacturable.
The parametric nature of SolidWorks really helps with the next steps - checking clearances through full range of motion, tweaking parameters, doing what-ifs. The front subframe is now where I like it. Weight is 21 lbs, which is actually less than the D4 machined suspension box with all the fittings. It's also almost self-jigging though a fixture will still be necessary. Rear subframe is next, then the backbone and the rollcage. Each has its distinct challenges - the front had to deal with the steering system, the rear needs to accommodate transmission, halfshafts and engine. Now it's now just a matter of working through them all.
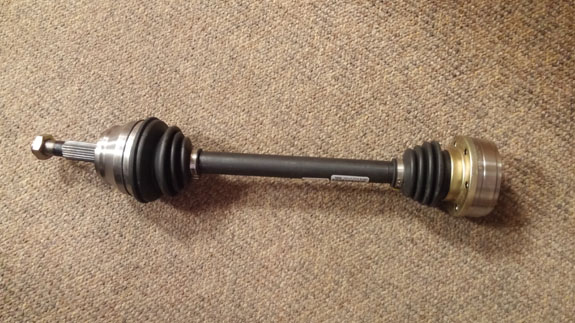
12/30/15 A bit more insight into the iterative process. Received the off-the-shelf halfshaft that I ordered a little bit ago. The goal is to be able to use these parts because they're readily available and inexpensive. Doesn't fit as-is because it's shorter than internet searches told me it would be, and the outboard CV is larger in size. But, with a few tweaks to the geometry of the suspension and the rear subframe, it can now be used. The shorter length actually allows for a more robust adapter from the slightly smaller inboard CV of the shaft to the larger flange on the G50 gearbox (we're mating VW Rabbit and Porsche 911 parts here). Since this car will be about half the weight of the 911 and similar power to the base version of that vintage, should be about right. There's always the option of building premium race versions of the shafts later if need be.
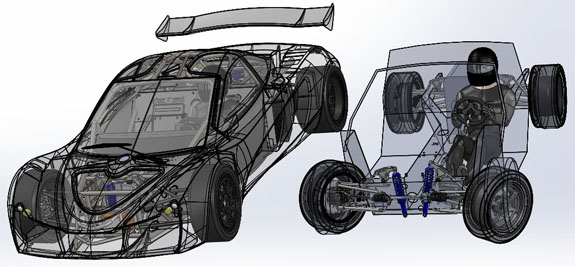
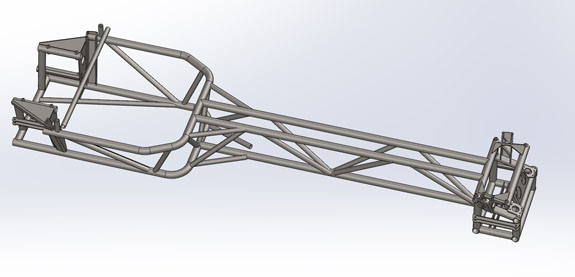
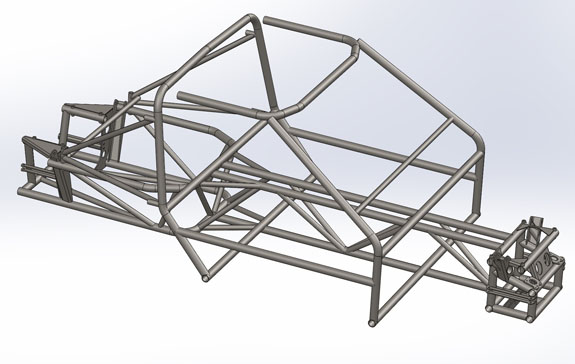
I've cycled through quite a few versions of the frame now. The basic backbone had come together and looked fairly elegant and manufacturable. Light, too, at only 103 lbs, and able to take a variety of powertrains including the Hartley V8 with the Hewland JFR sequential (same as D1). A different implementation than the original but still true to the concept at this point. I still can't help but admire the theoretical purity of the Lotus design, even though I'm making different choices now.
If simply upgrading the handling of the Europa was the goal, I'd call it good here and be close to done. However my idea of acceptable safety is drastically different from Mr. Chapman's back in the day, and so a rollcage of some kind is necessary. First (ish) pass at it resulted in a bolt-in structure that's a bit fussy, adds about 80 lbs and no appreciable stiffness to the backbone.
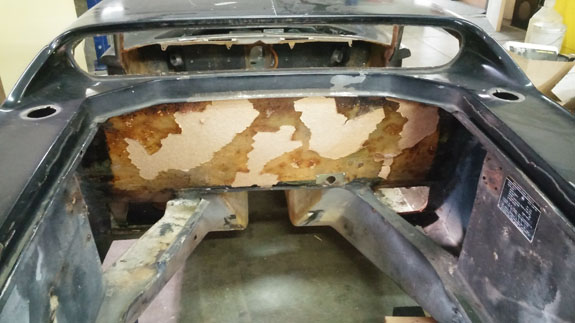
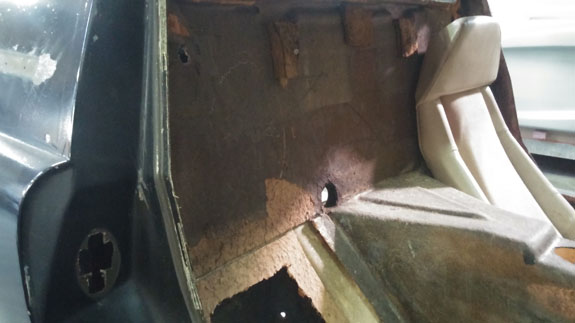
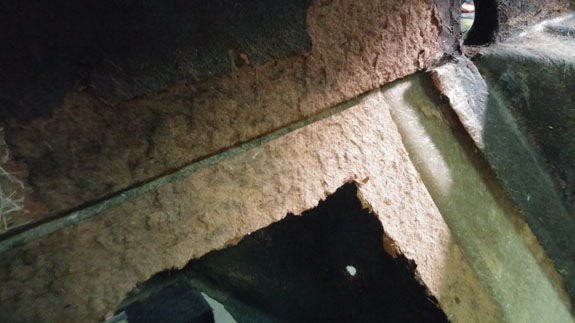
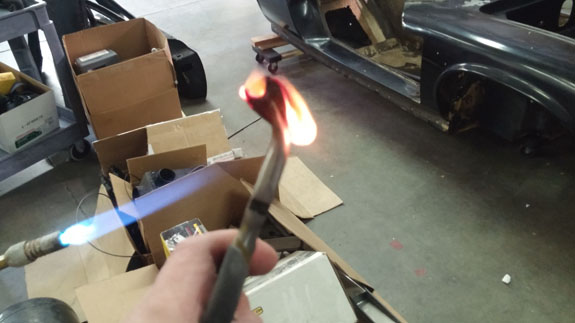
In the process of checking some measurements I was reminded that the Europa 'firewall' is actually made of some cardboard-like material that looks suspiciously flammable. A quick test shows that in fact it is. Also some flimsy fiberglass in the engine bay serves no structural purpose that I can discern but does obstruct things.
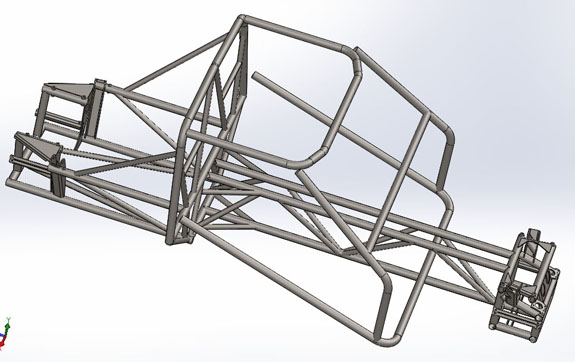
So, since the 'firewall' is going to have to come out anyway and the fiberglass is not a constraint, I can make the main rollbar hoop integral to the frame instead of removable. Makes the backbone-only portion less elegant, but the entire chassis when considered as a whole more so. And saves about 20 lbs as well as dozens of welds in the process. The forward portion of the cage still needs to be removable in order to install it, and more bracing is still needed at the front. Again, though, the cage's primary purpose is safety rather than stiffness (that said, I'll take all the improvement I can reasonably manage). Being constrained by existing tight packaging is a significant limiting factor. The original car was simply not designed with a rollcage in mind. To put it into perspective, the Europa is a longitudinal engine design with a 40" overall height and a 92" wheelbase. In comparison, the modern Elise has the packaging advantage of a transverse drivetrain but is almost 46" tall with a 91" wheelbase (and it's still considered cramped by many). As with my other cars, I'm using 1.5" OD, 0.120" wall chromoly tubing for all impact structure. Way overkill for a vehicle this light (the sizing exceeds SCCA spec for cars over 2,500 lbs) but the weight penalty is minimal and the satisfaction of knowing I've taken some meaningful and deliberate steps to help protect the occupants is well worth it. Can't protect against everything of course, but it's good to make the effort. The structure in the pictures is not complete. There will be considerably more gusseting when all is done, and possibly a double bottom rail on the backbone instead of a single one.
I'm now looking for a quick way to prototype the structure - maybe use flexible exhaust tubing or get PVC pipe and heat-bend it. Since I don't have a CAD scan of the bodywork, and the fit is pretty close, I would prefer not to go directly to steel if there's a reasonable way to check dimensions and fit in real life first. As with all such things, there comes a point where amount of effort/time/expense to prototype something manually exceeds the risk of just going for it and using the first article as the prototype. We'll see. Site Sponsors and Links:
|