|
04/09/09 Well, we did end up pushing the trackday out - the new date is May 29. In the meantime progress has not slowed down on Bikini. I finally have a delivery date for the hubs (next week) and the rest of the parts are here, ready and assembled as far as can be done right now. I'll post the exact details on the kits and their contents when everything is here.
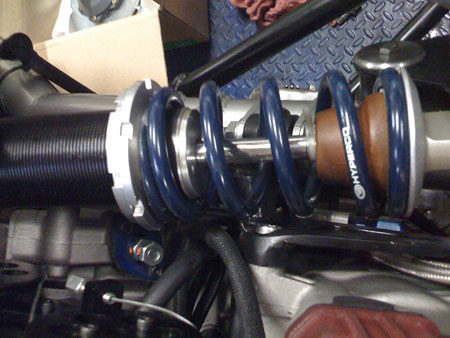
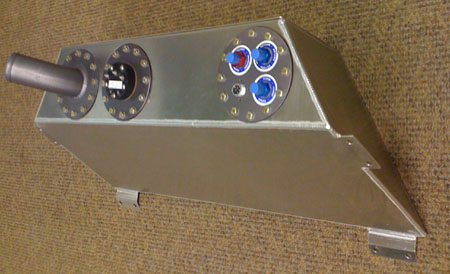
The fuel cell is on the way and should be here tomorrow. In preparation for its arrival the re-assembly process is moving right along. This now allows to verify the clearance between engine mount and shock - the customary quarter inch, I'm happy.
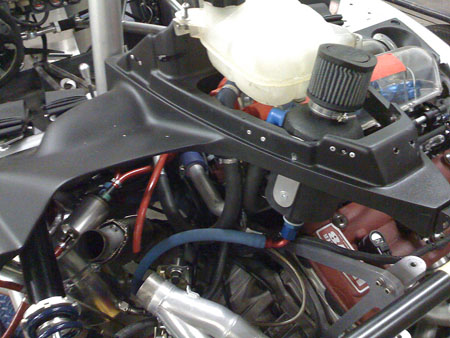
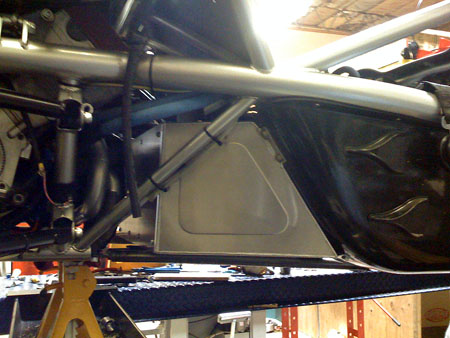
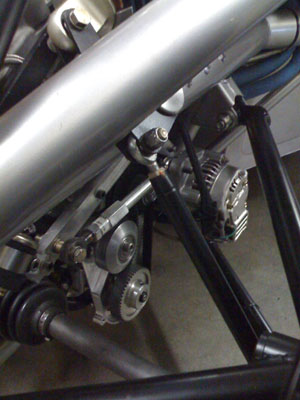
It took a while to figure out the best location and configuration for the oil catch can but scooting the coolant reservoir forward 1/2" made enough room for it under the 'scoop'. Tristan made a nice bracket and routed the drain line.
Lesson learned from all the earlier iterations, the new can has two -12 vent lines coming into it and one -8 drain line going back to the tank. All I can say is this better work :) For the moment we've put the OEM uprights back on. It's frustrating to not be able to run my new design but in about a week that'll change. Hopefully the stock ones will last until then. It's raining now anyway so probably won't get to drive the car in the next few days. 04/10/09 The first day of Karl's visit also coincides with a number of parts showing up. The fuel cell is the big one. Fuelsafe did a good job on it, it appears to be exactly to print and well made.
Also here are the parts for making the chassis brace. Everything will get installed over the next couple of days. I'm sure there will be challenges. I also designed a billet belt cover to keep the dirt off the oil pump and alternator belts. Hopefully Jared will be able to machine it over the weekend.
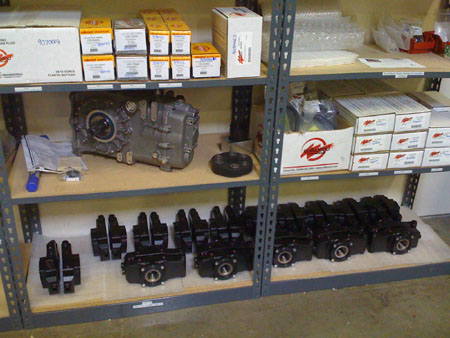
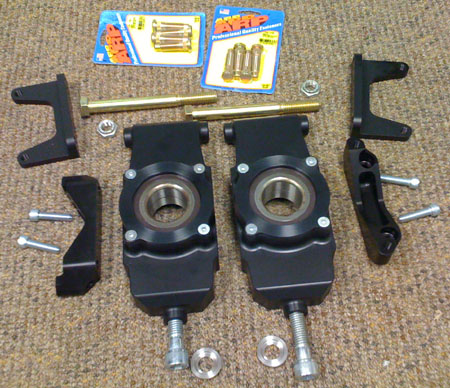
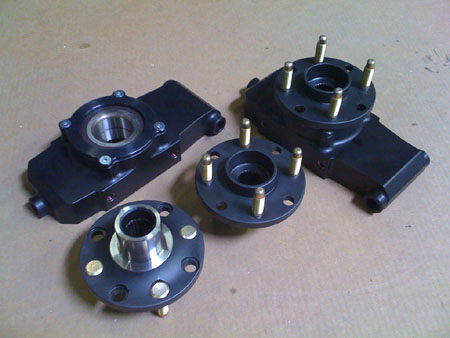
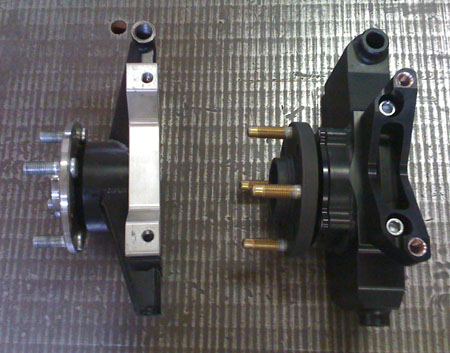
One thing that I'm still waiting for is the drive flanges for the uprights but in the meantime this is what the full kit will look like (well, plus the drive flanges of course!).
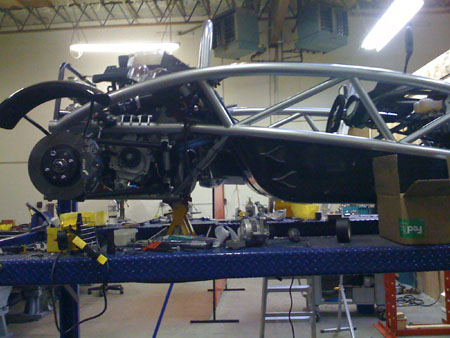
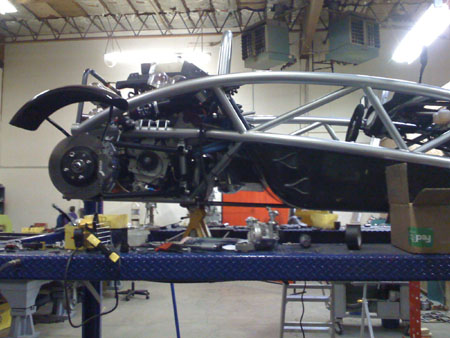
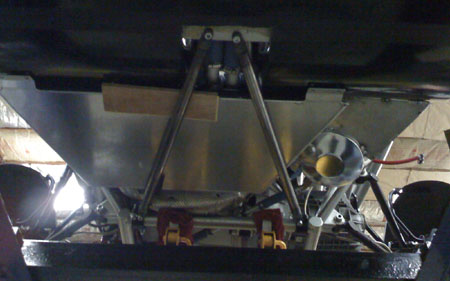
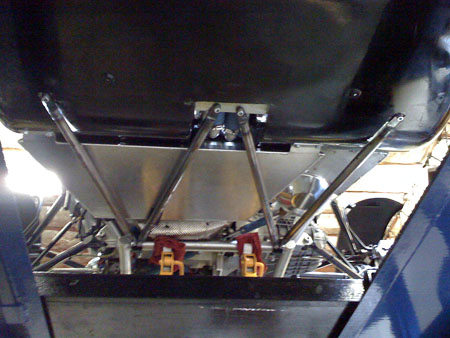
The two uprights with bearings pressed in, brake brackets (the parking brake brackets are optional) and hardware. The latter includes custom stainless safety washers for the upper arm rodends and ARP wheel studs (these will be pressed into the drive flanges). 04/11/09 Today we had the WHOLE crew working at the shop - Karl, M, Tristan, Jared and myself. And everyone got a lot done. One thing we got done is building the chassis brace. Once that is in place the fuel cell can be mounted (we had to make sure it will clear the brace tubes). Without a fuel tank the chassis really looks like it's missing something (it is).
Test-fitting the brace ties the rear box structure to the steel underseat reinforcement (this part is only on the Brammo Atoms, the Atom 1 and new Atom 3 don't have it so you can't fit a brace on them)..
The fuel cell is mounted to the fiberglass tub but the brace acts as a safety backup to make sure that if something goes wrong with the mounts the cell doesn't drop down or drag on the ground. The brace also provides significant crush protection to the fuel cell.
There are two more tubes that make up the brace which still need to be installed. Small portions of the fiberglass tub are cut away to expose the underseat tube to which the brace is attached. In the last picture above you can see how the fuel cell is offset to the side to make room for the oil tank next to it and it illustrates why the oil tank mount had to be of such odd shape. More on the progress tomorrow. There should be updates on dp1 and dp1/e also. 04/15/09 The hubs still aren't here (but supposedly on the way) so we put Bikini back together with the stock uprights and drove it today. The chassis brace is now in. It'll get powdercoated when we do the dp1 suspension arms in a few days. The fuel cell is also in and fully plumbed.
Next on the list is installing the just-fabricated belt cover and hooking up the alternator so we can go for a proper drive. Today's blast around the block was made without alternator, just running electricals off the battery. The car is a beast - did I mention that? :) Wheelspin everywhere. Of course this is helped by the fact that I noticed I wasn't getting full throttle opening out of the available pedal travel (M's response was WHAT?!!). So this has now been rectified and after some puzzling but temporary misbehavior from the CPU when trying to recalibrate the stops all is better now. The fuel map still needs a lot of tuning but even so it's a very entertaining device. 04/17/09 Lots of progress today and part of it is on the Atom. The most exciting news is that the UK hubs finally showed up! So we'll be able to ship the existing orders in a couple of days (it takes a bit to put everything together). The parts do look pretty.
The US hubs are still a week out so Bikini will have to wait a bit before getting new legs. But progress continues in the meantime. We have tweaked the fuel map, fixed oil leaks, taken things apart and put them together. Then we went for a drive and ran out of gas (good to have support crew with cans of gas standing by only a phone call away). The car is getting there.
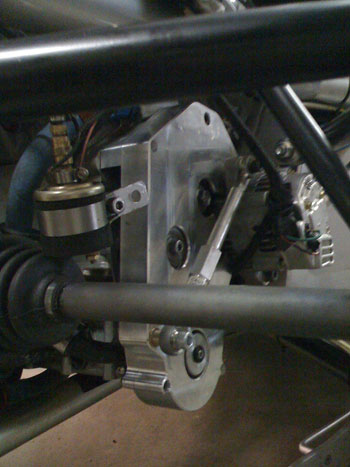
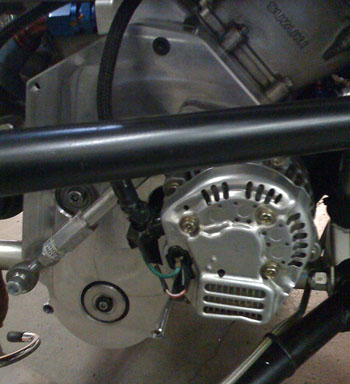
The second half of the belt cover is getting made so we rigged up the base half with a hookup for altenator belt tensioning. It works.
So quite a bit is now done, much more remains. Having tangible things to show for all the effort definitely helps motivation-wise. This will continue. 04/20/09 While M was off at the track putting the Mini through its paces, I was back at the shop getting UK upright kits ready to ship and finishing up some details on Bikini. Jared machined the second part of the belt cover and Tristan installed it (constantly giving me grief about the amount of tweaking required, but I expected this since the CAD models I have of some of the parts are approximate at best and there was no time to recheck everything). Works out OK in the end.
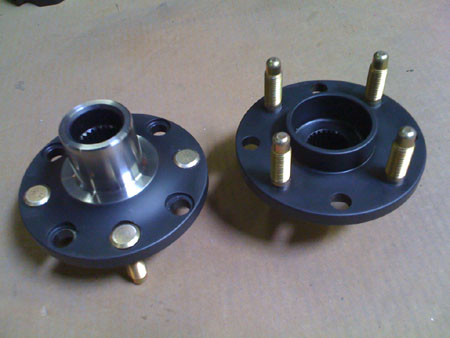
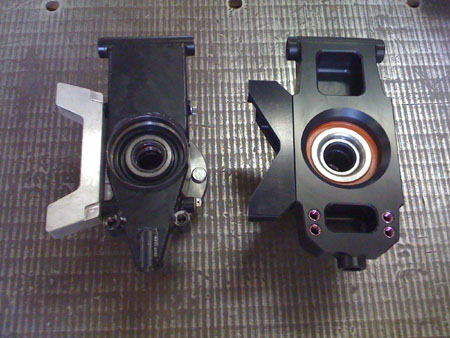
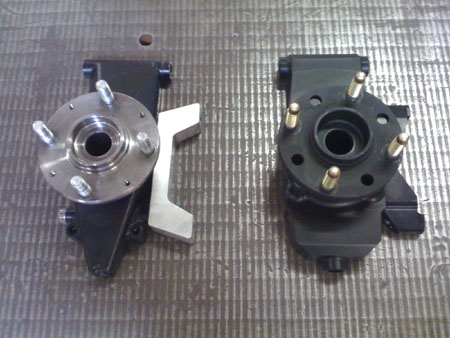
While things like this are getting done, the fuel map is totally messed up, at least in part due to the new fuel pump and the changes in plumbing. I've tried tweaking the map it but really haven't given it the proper amount of attention or time (too little of either to go around right now). So at the moment the car is essentially undrivable due to a combination of a tendency to die off-idle and a very grabby race clutch. I remembered this too late, after driving out to visit M at the track in the afternoon. The return trip in rush hour traffic was extremely frustrating and at some point I ended up stranded a dozen blocks from the shop, with no way to get going up the slight incline that the car had died on and with an exhausted battery. So Tristan had to come rescue me with the truck and pull Bikini back home. I will need to dedicate some time to tuning the map. The A/F gauge shows that the car is running very rich under most conditions, as rich as 10:1. So this will be another learning curve but hopefully one more skill will result when I'm done. It's very likely I'll rent some dyno time. There are a couple shops around here with DynaPacks which can hold set RPM under load. That should help with mapping. And yes, someday we'll get our own but not just yet. 05/10/09 We FINALLY got some US hubs. Only a couple so far but more are on the way. Delays aside, the parts are very nice and fit well. So in the coming week we'll actually be able to ship out some orders. Fancy that. Here are some pics of stock and replacement uprights, all assembled.
Mine weighs about 3/4 pound more when fully assembled. Not bad considering how heavy the bigger bearing is. I now have them mounted on the car though haven't had a chance to drive it yet.
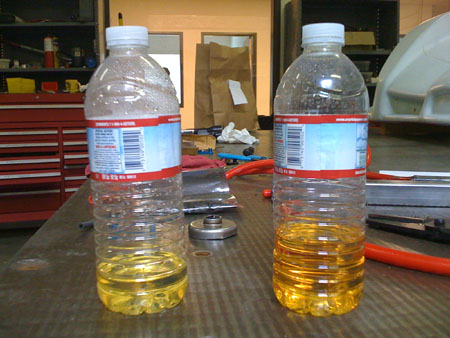
With the fuel cell came instructions to run a full tank and change the fuel filter. This is what we did (easier said than done due to some inexplicable quirks in the fittings that Brammo supplied). The odd part is that the gas that was in the filter is significantly discolored from what regular gas is (the Atom sample is on the right in the picture below).
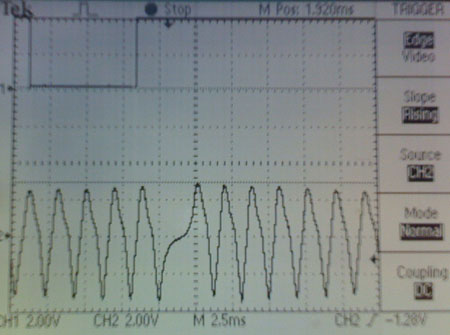
Oddly it also doesn't smell much like gas and more like cheap perfume. This may be a contributing factor to the drivability issues, although I have no idea what would cause this. Just to be safe we drained the whole tank and will refill it with fresh gas in the next couple of days. Dyno time for mapping is scheduled for next Thursday. 05/21/09 This update is the culmination of qute a bit of work actually. As I had mentioned previously the Atom had some serious drivability issues and wouldn't start when hot. I thought I could fix it with fuel mapping but when we loaded it on the dyno at the appointed date a week ago it just refused to run once warm and the one time it did catch, kind of, it misfired badly and quit. We cleaned the plugs, replaced coils, tested injectors - all to no avail. So we packed it up and rescheduled for Monday. Over the weekend I spent more time tinkering with it - runs fine when cold, refuses to work once hot. After several phone calls to John to get ideas and tell him what was happening, he suggested it might be a crank sensor problem. With all the oil spray earlier and pulling the engine out it's possible something got messed up with the wire or the sensor itself. I dug out my scope to check the signal (haven't used that thing since electronics hardware design days). With engine cold at idle speed everything looks normal. The missing tooth is in the middle and the signal rises nicely across the gap, just like it should.
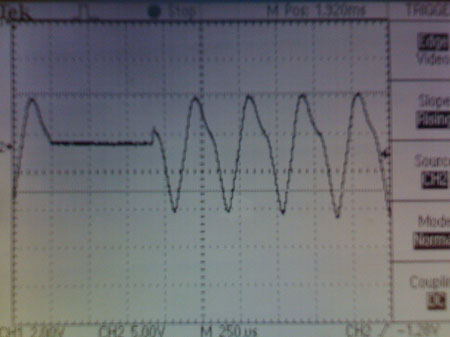
So I let everything warm up and revved it, where it started misfiring with some regularity. Took a bit to catch it but the error is right there:
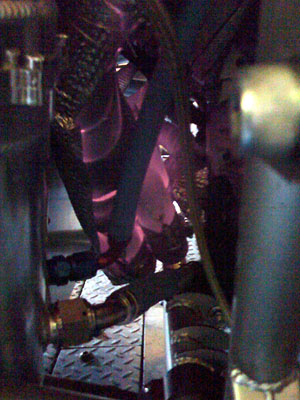
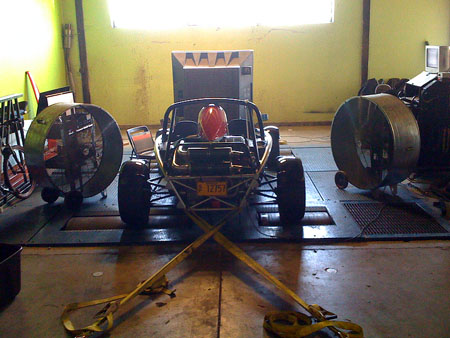
The signal drops out for almost 750us and then comes right back - enough for ECU to lose sync. Whether it's the wire or the sensor, the failure mode is clear. So John overnighted us a new sensor and cable for Tuesday morning. Of course we had to reschedule the dyno time again, to today. Tuesday the sensor showed up in the early, Tristan did a fair bit of disassembly to get to all the wiring and I spliced in the new cable. All reassembled, it runs and looks good. Since the throttle bodies had to come off we checked synchronization between cylinders and found them in need of considerable adjustment. So we did that and I tweaked the map a little to get it to idle reasonably well and not stall when blipped. Today we trailered the car back to PDX Tuning who have been very understaning and very helpful. They primarily specialize in Subarus but are experienced in tuning all kinds of engines. Their dyno is an AWD Mustang unit with an eddy-current brake to vary the load and/or hold RPM. Being a newbie at this it was very beneficial to get an explanation in how the tests are run and what we're trying to achieve. I had gotten some very thorough advice on mapping previously but during the run with 400hp screaming at 9K+ RPM inches behind the back of my head I had to just get it down to an easy-to-follow routine. I even put gaffer tape on the laptop screen to mark the specific throttle columns on the map that we were testing. The procedure is straightforward - get the rollers moving in first, shift up to third, open the trottle to get it in the desired column and hold while the dyno lets the roller accelerate through the RPM range, then shut it down and repeat for next column. The dyno logs A/F ratio so after a set of runs we look at the plots, adjust the map and repeat. On the first run we held it under power a bit long and when M yelled 'fire' I shut it off, undid the extinguisher and jumped out. Fortunately it was just some stuff burning off in the exhaust wrap and any actual flame was fully contained by the shielding. The headers were still glowing after I got out, firgured out that there was no emergency, then got the iphone out and took the picture.
According to M they were very bright orange before. The shielding really works wonders - the fuel cell wall wasn't even warm. However in one spot on the frame about 2" from an unshielded header there were a couple plastic zip ties. They just melted and fell off. No real damage though so my overall heat management strategy seems pretty sound and passed this rather extreme test. After this we decided to limit test runs to 15 seconds under power (plenty with the wideband O2 sensors) and also pointed two large fans at the engine compartment.
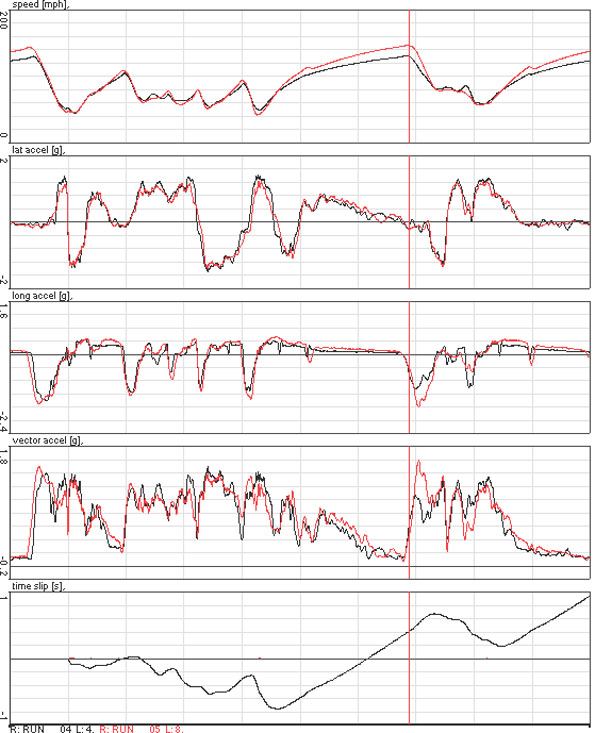
There were no further heat issues and the headers never glowed again even under full power. This does serve as a valuable lesson though and I've already redesigned (in my head for now) the heat management approach on the dp1. Bikini is intended as a tesbed and it's serving this purpose beautifully. I really couldn't have planned the learning experience better. So even though it's at times very frustrating, all this is just the necessary part of paying the dues that go with pushing the envelope. As such, a very good day. Finally. The oil even stayed in the tank. I'll get the power plot shortly and will post it then, but generally after messing with the fuel map a bit we got 330hp at the wheels at 9K RPM (I didn't want to push the redline but power was still going up at that point). Also, the dyno is supposedly reading a bit low at the moment. At any rate, we're at roughly 400 hp at the crank which is exactly what is expected, so all is well. The map definitely needed adjustment so it was time and effort very well spent - we gained over 10 hp in the process. John now has a dyno and will deliver subsequent engines that are closer mapped, but this was the first engine he built for a customer so I had to start with an approximate map from a different H1 with a different exhaust and intake. Now it's pretty close to what it should be. The torque curve is nice and flat, too. In a 1,250 lb car this is plenty :) Tomorrow is a Lotus trackday so we'll see how that goes. Wish me luck. 05/22/09 (updated 5/25) FINALLY. I've completed not just a couple laps but a whole 3 sessions at PIR! It only took something like 3 years to do it :) Now that the engine is healthy it's simply amazing. The power just keeps coming, very linear and controllable, and the soundtrack matches it perfectly. Yes, there are simpler ways to get 400 hp in a car like this but this is sweet. The dp1 with this motor will be off the scale. Of course with all attention being focused on the engine I've not taken any time to set up the suspension (rear camber is quite a ways off, for one). So the car skates through corners and totally rips on the straights, although getting a good drive out of the turns is easy and I can just squeeze the throttle on, sometimes even before the apex. Of course I need to set up the rest of the car and also recalibrate myself to driving it, but the result is pretty good even now - 1:21.9 best lap. This is the fastest I've gotten around this track, ever. And the car has another 2-4 seconds to go, I just need to figure out how. It's an interesting exercise to compare to the fast lap Darin ran last year in his 245hp Atom. Back then he posted a time of 1:23.15 which is quite a feat. The plot below tells the tale:
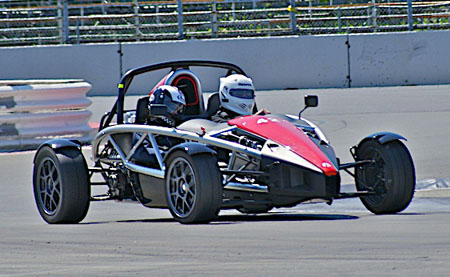
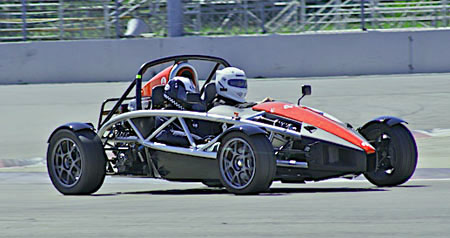
Bikini's advantage is clear - 15mph more speed at the end of the straights (145 vs 130). The handicap is also obvious - low cornering speeds. I could not get any heat in the tires and the rear camber being off made for some interesting exercises in throttle control and yaw control under braking. The bottom trace, time slip, shows that Darin was actually 0.8 seconds ahead at the exit of the esses but lost it all to acceleration difference on the back straight (and braking into turn 10, where the cursor is). What this means is that once the car is fully sorted I should be able to circulate the track at a pretty decent pace :) In the meantime there are a few maintenance items to be taken care of before our own event at ORP next week. No rest for the wicked. UPDATE: the pictures below show what I mean about the rear camber... (thanks to Scott for the photography).
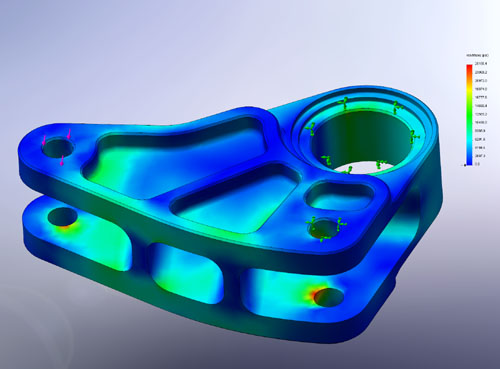
06/13/09 There's something that's been bugging me for a while. I've increased my spring rates quite a bit over stock, to 230 lb/in front and 340 lb/in rear. Yet still, my telltale zip tie on the shock is indicating that I am getting some 3" of travel in the back, and I've only been driving on the track. So recently as I was looking at upgrading the woefully inadequate pushrod rodends, I took a look at the bellcrank geometry. Much to my surprise it turns out this is a FALLING rate linkage, meaning the effective spring rate decreases as the suspension is compressed. WOW. No wonder there are so many reports of people bending bellcranks and/or frames (if the bellcranks are upgraded to stronger ones). While of course this is another ready business opportunity, as a customer who paid a fair bit of his own good money for a supposedly high-performance car, I'm getting a bit annoyed. I mean really. Sure, I'll fix this like I fixed the uprights and like I'll fix the pushrods and like I've fixed the chassis. At least I have the capability to do so. Rest assured my cars are not going to be like this, especially after 10 years on the market! Well, enough on that and on with the fix. The bellcranks I'm designing will look superficially similar to the Brammo billet upgrade ones but the actual design, and most importantly the geometry, are quite different.
The target load is 1,600 lbs on the shock with 1.5x safety factor. Yes, you can hang the whole car from it. There is going to be a needle bearing for the pivot like the stock design but also needle thrust bearings in both directions to handle off-axis loads and further reduce friction, instead of the stock plastic washers. The linkage is now sligthly progressive instead of regressive. Weight is 0.7 lb per corner which I think is a bit lighter than Brammo aluminum units. The pushrods will get proper -8 rodends instead of the injected-race -6 bits the car came with. And yes, all this will be available as an upgrade, pricing to be determined shortly. As a ballpark, the Brammo billet uprights sold for $800 for a set of 4 and that's probably pretty close to what mine will be. The pushrods themselves will be around $75 per corner and the rodends will add roughly $60 per corner to that. All this is preliminary of course... |